In the last post I create a material like the one used in FFXV noctis magic swords. But in reality, the game material sure looks waay simple.
I though It will be a good idea to explore some more common "real world" material techniques. So lets see how to create very cheap crystal materials with lots of scalability options.

Really, the main thing we need to make a shiny crystal material its a good reflection. Lets take a look to two good examples:
This two are examples of "real world" uses of crystal like materials in current times. Taking a look you can see that none of them uses super expensive fancy techniques, the Yoshis gems have an opaque material with custom reflection and the FFXV uses a simple but effective reflection with a little refraction. I picked this two examples as I happen to have played recently both games.
So lets try to understand how reflections work in the first place. Roughly speakibn, by default, the unreal opaque materials use the nearest reflection capture texture. But the transparent materials, need to be in a lighting model Surface ForwardShading or Surface TranslucencyVolume to be able to have the same behaviour. This modes are the most expensive ones for transparency wich by default is already very heavy. Without getting into much detail, the overall base instructions for the materials are:
Opaque unlit 30
Opaque lit 120
Transparent unlit 50
Transparent Volumetric NonDirectional 70
Transparent lit forwardShading 770
Transparent lit translucencyVolume 310

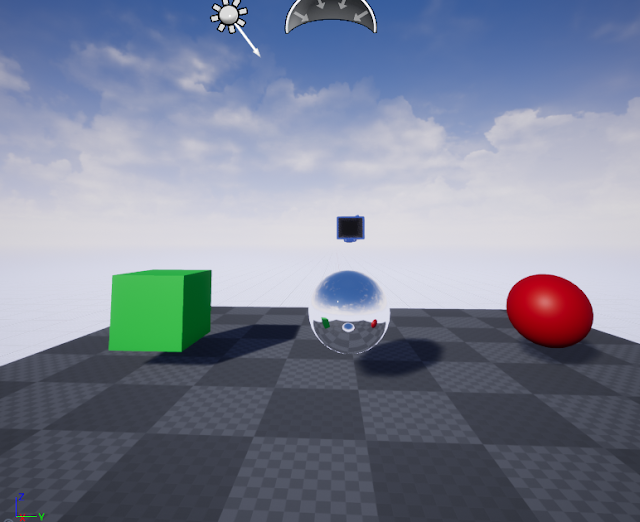
In this image you can see in the left the opaque material and the translucent with translucencyVolume on the right. Note that the transparent one doesnt recieve SSR(screen space reflections). We can enable them in the translucency tab next to lighting mode, but that alone will add about 120 instructions.
Knowing this, lets do some cheap cool crystal like shaders. First of all lets start with an unlin opaque shader model, and make a reflection cubemap. To do this add to the scene a scene capture cube, create in the content folder a RenderTargetCube (right click->materials and textures-> cube render target) and link the render target to the scene capture.
To use this render target in the material we can drag it into the shader graph and use it as a texture. As UVs we will use the ReflectionVectorNode. Plug the texture into the emissive and the material should behave as a reflective mirror.

Notice that the sphere is reflecting itself, this could be usefull in many cases, but you can disable just by adding the sphere in the hidden actors list of the scene capture.
If you move the scene capture, the reflection will update in real time. This is expensive, but If you need accurate real time reflections in any actor its a good starting point, just attach the scene capture to your actor.
Have in mind that for this particular case, we dont need to use the eye adaption node, since the brightness of the reflection itself should be taken into the eye adaption as well as the overall scene. We will use it nontheless if we want a consistent brightness independent of the eye adaption.
In the case you want hard edges on a sorftened normal mesh (like with gems or crystals) that you cant or dont want to soften for any reason, you can still get those hard edges in the shader just by doing this and using world space normals(by disabling tangent space normals)
Lets begin making a cool reflection enviroment. Lets create a new empty level and place a scene capture cube on it linked with our render target. I found a confortable setup having the render target visible while adding objects and lights on the scene, and having an object with the material we are creating to see real time how it looks.
A good tip its to use volumetric lights and flat bright shapes to get hard reflections, but anything goes here as long as you like the result (remember to hide the preview object in the scene capture). If you dont know exactly what you want a good practice is to look at real life light setups, this will give a professional look to your cubemap.
Once you get what you want right click on the cubemapRenderTarget and create static texture. Now we dont need the scene capture.
Here is the fast set up that I will be using:


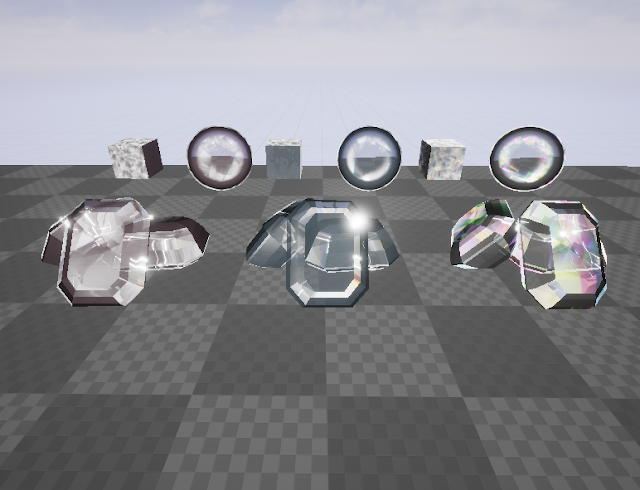
So far the fake reflections do a good job in hard surfaces, now its time to adjust the color and the intensity of the reflection. For this we can connect two colors blended by a fresnel, so we can shade a little bit. Also we can tint the reflection. And thus far, here is how our crystals look, they are highly customizable and with only 65 instructions.


We can go a little bit further by making the material lit, this will give us aditional reflections, light shading and a metalic atribute to play with. To not complicate things too much, I plugged in the colors we have into the base color and the reflections into emissive.
But you can try applying normals, adding a base color and the ones we got to emissive, apply more than one cubemap, use the fresnel to change the roughness/metallic/specular values, add textures,... anything goes!


I though It will be a good idea to explore some more common "real world" material techniques. So lets see how to create very cheap crystal materials with lots of scalability options.

Really, the main thing we need to make a shiny crystal material its a good reflection. Lets take a look to two good examples:
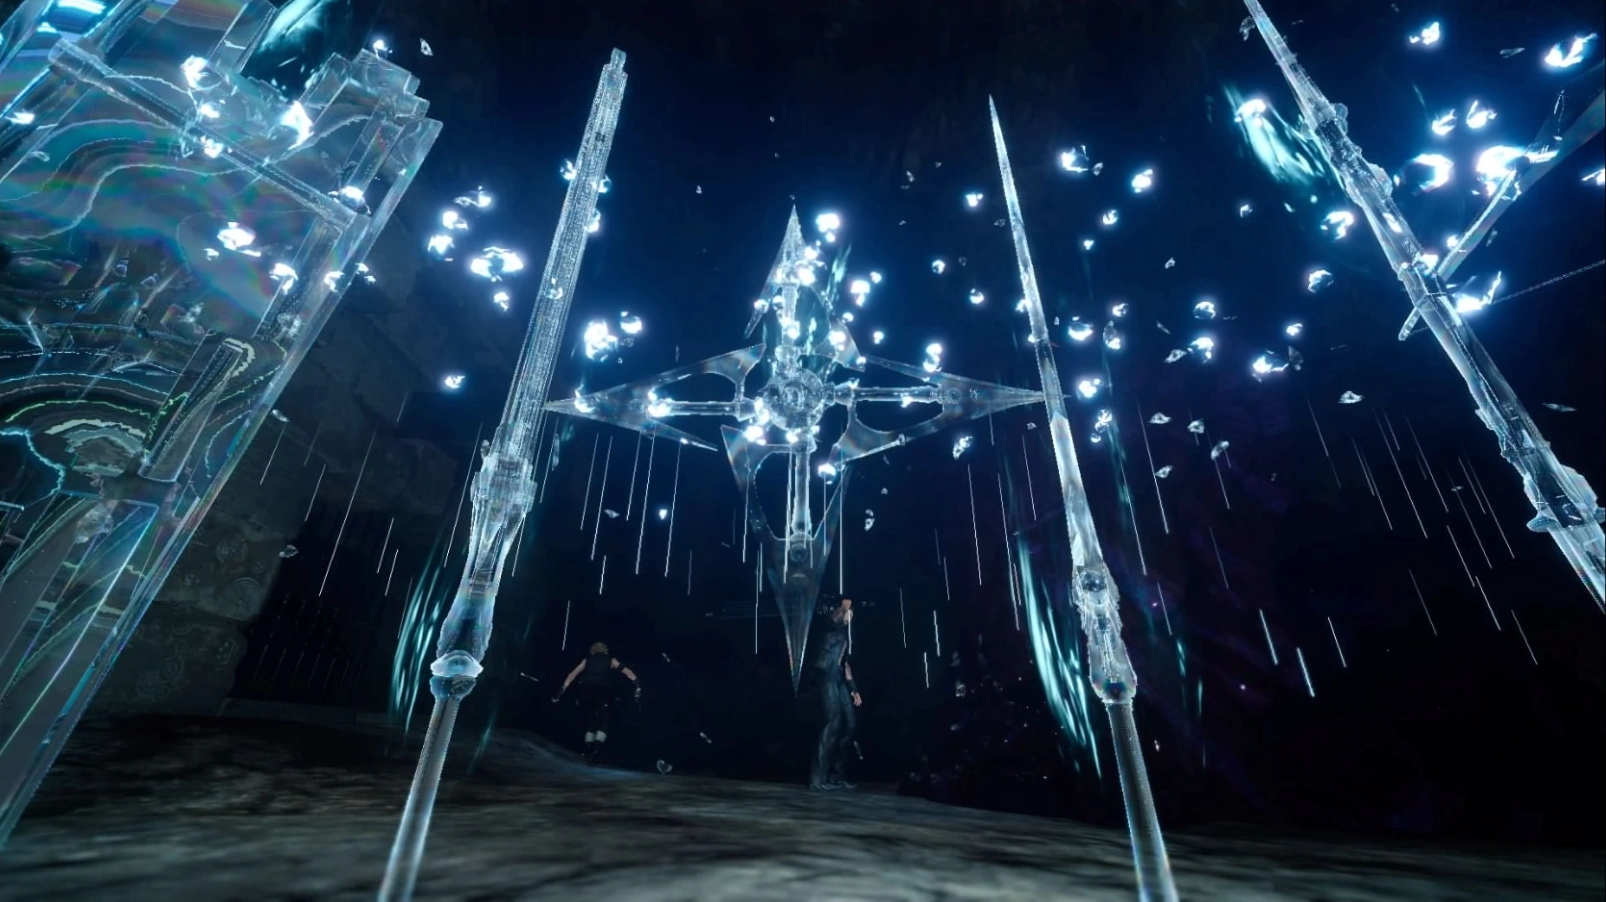 |
| Image from the FFXV wiki(finalfantasy.fandom.com) |
This two are examples of "real world" uses of crystal like materials in current times. Taking a look you can see that none of them uses super expensive fancy techniques, the Yoshis gems have an opaque material with custom reflection and the FFXV uses a simple but effective reflection with a little refraction. I picked this two examples as I happen to have played recently both games.
So lets try to understand how reflections work in the first place. Roughly speakibn, by default, the unreal opaque materials use the nearest reflection capture texture. But the transparent materials, need to be in a lighting model Surface ForwardShading or Surface TranslucencyVolume to be able to have the same behaviour. This modes are the most expensive ones for transparency wich by default is already very heavy. Without getting into much detail, the overall base instructions for the materials are:
Opaque unlit 30
Opaque lit 120
Transparent unlit 50
Transparent Volumetric NonDirectional 70
Transparent lit forwardShading 770
Transparent lit translucencyVolume 310

In this image you can see in the left the opaque material and the translucent with translucencyVolume on the right. Note that the transparent one doesnt recieve SSR(screen space reflections). We can enable them in the translucency tab next to lighting mode, but that alone will add about 120 instructions.
Knowing this, lets do some cheap cool crystal like shaders. First of all lets start with an unlin opaque shader model, and make a reflection cubemap. To do this add to the scene a scene capture cube, create in the content folder a RenderTargetCube (right click->materials and textures-> cube render target) and link the render target to the scene capture.
To use this render target in the material we can drag it into the shader graph and use it as a texture. As UVs we will use the ReflectionVectorNode. Plug the texture into the emissive and the material should behave as a reflective mirror.


If you move the scene capture, the reflection will update in real time. This is expensive, but If you need accurate real time reflections in any actor its a good starting point, just attach the scene capture to your actor.
Have in mind that for this particular case, we dont need to use the eye adaption node, since the brightness of the reflection itself should be taken into the eye adaption as well as the overall scene. We will use it nontheless if we want a consistent brightness independent of the eye adaption.
In the case you want hard edges on a sorftened normal mesh (like with gems or crystals) that you cant or dont want to soften for any reason, you can still get those hard edges in the shader just by doing this and using world space normals(by disabling tangent space normals)
 |
| Shader hard edges could be very usefull in situations where you just want to set hard edges by material instead of by mesh. |
Lets begin making a cool reflection enviroment. Lets create a new empty level and place a scene capture cube on it linked with our render target. I found a confortable setup having the render target visible while adding objects and lights on the scene, and having an object with the material we are creating to see real time how it looks.
A good tip its to use volumetric lights and flat bright shapes to get hard reflections, but anything goes here as long as you like the result (remember to hide the preview object in the scene capture). If you dont know exactly what you want a good practice is to look at real life light setups, this will give a professional look to your cubemap.
Once you get what you want right click on the cubemapRenderTarget and create static texture. Now we dont need the scene capture.
Here is the fast set up that I will be using:

 |
| Final texture Ill be using |

So far the fake reflections do a good job in hard surfaces, now its time to adjust the color and the intensity of the reflection. For this we can connect two colors blended by a fresnel, so we can shade a little bit. Also we can tint the reflection. And thus far, here is how our crystals look, they are highly customizable and with only 65 instructions.


We can go a little bit further by making the material lit, this will give us aditional reflections, light shading and a metalic atribute to play with. To not complicate things too much, I plugged in the colors we have into the base color and the reflections into emissive.
But you can try applying normals, adding a base color and the ones we got to emissive, apply more than one cubemap, use the fresnel to change the roughness/metallic/specular values, add textures,... anything goes!


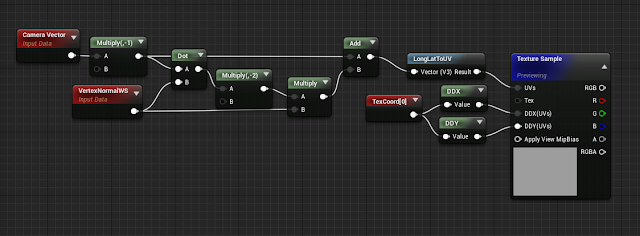
Another good way to go its to use textures with a different bumpOffset each (bumpOffset Its one of the oldest tricks in the book for a reason). We can use this to fake highlights and even chromatic aberration. To show a different approach to reflections we can try to use the fresnel for a consistent circle of light effect.
To do this we just need the fresnel and a sine witn a period of 7 (you can increase or decrease the value to adjust the circle radius). In this case we will use a dot operation to get the fresnel, if you only need a soft gradient this will save you a couple of instructions.


To spice a little bit the reflection we can use a texture to alter the normals and simulate how light breaks when entering the surface. This can be extended to achieve a dual normal look. Change the height of this second reflection will give us a sensation of 3D depth in the shader. (Ideal for jewelly!).


*There will be a image at the end of the post showing how to get this textures. Although they are too fancy, they can be a good starting point for a good ones.
Just by tinting the reflections you can get game ready results with the current unlit shader:

If we remove the base reflection and make the material lit, we get the default reflection of the opaque material and our inner reflections, plus we can play with the base color to get rainbow like effects. Keep in mind that to use them you will need to add a multipler to tweak the emissive depending on the scene.

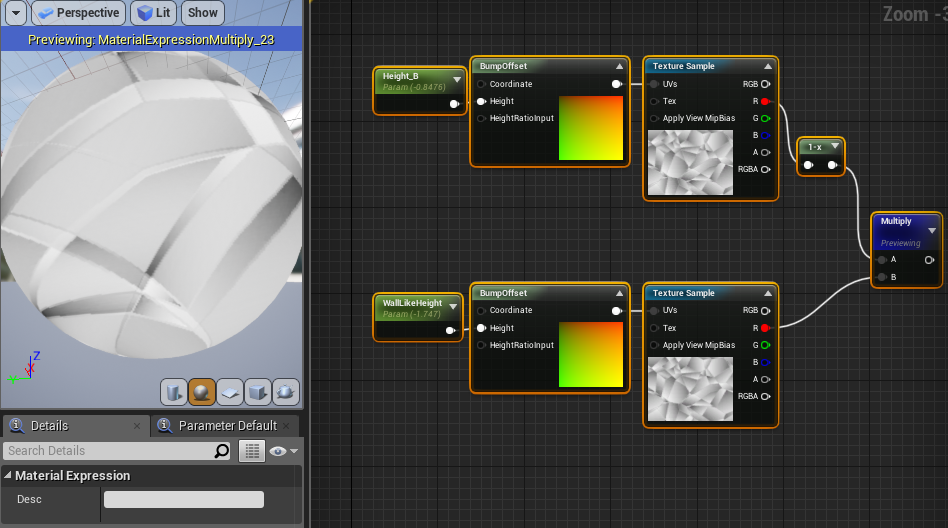
To spice things a bit, lets get back to the previous example for simplicity reasons and lets try to implement the chromatic aberration. Right now we dont have access to the background image, but we can fake it with a different method. Lets use different bump heights to get the chromatic aberration colors!


Also, multiplying an image like this with itself with a different height will give us an awesome wall like effect. This can be used to simulate cracks inside the crystal.

We can improve it by making the material lit so it recieve the light and give us acess to more attributes. But turning the material to transparent lit will be a better deal, as we dont really need the opaque lit extra attributes right now. So lets foccus on setting up the opacity values.


I added a couple of tweaks to be able to regulate the chromatic aberration intensity and add refraction.In this case we use a lerp to increase the difference between the base sample ( all samples divided by tree so the result is 0-1) and the one with crhomatic aberration. So the more we increase the value the more the differences will grow. I often use this to control the contrast of an image. and if you add or subtract a value before, you can control the brighness too. The setup its like this:
Finally lets add a extra shiny parameter to simulate the sparkling in the crystal. This can be done with one of the current samples we got, but I decided to make samples in and out of the surface to simulate the lens like effect of some of the highlihghts. And all with only about 140 instructions, a little more than a clean opaque material!

Keep in mind that this techniques work with the cubemap approach as well. And you can get away with a lot less, for example, if you cant spend too many resources you can try to add the chromatic aberration into the enviroment cubemap texture. And by the way, If you dont want to deal with cubemaps, you can sample a current 2D texture as a cubemap like this:
So I think this is all for now, remember that the you can allways get away with aproximating things instead of having to spend tons of resources in precise calculations. Have fun with shaders and be creative when optimizing!!
To do this we just need the fresnel and a sine witn a period of 7 (you can increase or decrease the value to adjust the circle radius). In this case we will use a dot operation to get the fresnel, if you only need a soft gradient this will save you a couple of instructions.


To spice a little bit the reflection we can use a texture to alter the normals and simulate how light breaks when entering the surface. This can be extended to achieve a dual normal look. Change the height of this second reflection will give us a sensation of 3D depth in the shader. (Ideal for jewelly!).


 |
| The texture Im ussing for the inner reflection. |
*There will be a image at the end of the post showing how to get this textures. Although they are too fancy, they can be a good starting point for a good ones.
Just by tinting the reflections you can get game ready results with the current unlit shader:
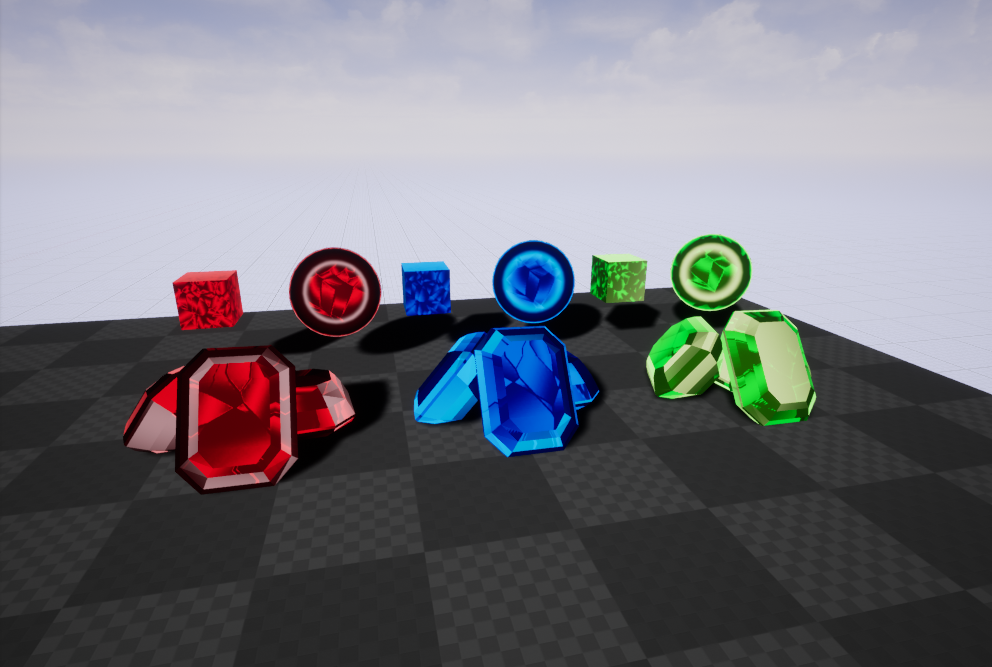
If we remove the base reflection and make the material lit, we get the default reflection of the opaque material and our inner reflections, plus we can play with the base color to get rainbow like effects. Keep in mind that to use them you will need to add a multipler to tweak the emissive depending on the scene.
 |
| Shadow changing colors! |


Also, multiplying an image like this with itself with a different height will give us an awesome wall like effect. This can be used to simulate cracks inside the crystal.
We can improve it by making the material lit so it recieve the light and give us acess to more attributes. But turning the material to transparent lit will be a better deal, as we dont really need the opaque lit extra attributes right now. So lets foccus on setting up the opacity values.


I added a couple of tweaks to be able to regulate the chromatic aberration intensity and add refraction.In this case we use a lerp to increase the difference between the base sample ( all samples divided by tree so the result is 0-1) and the one with crhomatic aberration. So the more we increase the value the more the differences will grow. I often use this to control the contrast of an image. and if you add or subtract a value before, you can control the brighness too. The setup its like this:
 |
| This is an easy and cheap way of tweaking contrast and brightness of anything! |
Finally lets add a extra shiny parameter to simulate the sparkling in the crystal. This can be done with one of the current samples we got, but I decided to make samples in and out of the surface to simulate the lens like effect of some of the highlihghts. And all with only about 140 instructions, a little more than a clean opaque material!


Keep in mind that this techniques work with the cubemap approach as well. And you can get away with a lot less, for example, if you cant spend too many resources you can try to add the chromatic aberration into the enviroment cubemap texture. And by the way, If you dont want to deal with cubemaps, you can sample a current 2D texture as a cubemap like this:

 |
| The node graph in substance designer to create the textures, red channel for the standard one and the green for the highlights. |
Comments
Post a Comment