
Ah, soft volumetric gradients <3 Lets get to it!
The plan is to trace rays from the camera, and as we advance, calculate the color and opacity of the different points along the ray. Using all this points we will get the final color and opacity of each pixel. This type of shader is quite expensive out of the box, so we are going to see as well some ways to optimize it.
I want to make this as straightforward and easy to understand as possible, so I wont be using many scientific terms or exact math. In the reference section you will find links to a more academic approach. With that said, after reading this post you should have a solid understanding of the how and why.
Preparing the volume
We are going to trace the rays along the camera vector and take samples along it to check the volume density. You may be wondering: Why use multiple samples? Thecnically we can calculate the density along the ray for a given volume at a constant or easy to calculate density, but in practice this calculations gets very expensive very fast with different shapes and densities. With samples we assume a constant density until the next sample, so the math remains simple. It works for any shape and density no matter how crazy and strange it is.
Keep it simple
Samples are great, but we cant make infinite samples, that will take forever. So we need a maximum distance to our traces or a maximum trace amount.
This is the base of our volumetric renderer, a simple for loop sampling along the view ray:
  struct Vol
{


    float4 VolTrace (){

        float3 ce = 0;
        float3 ro = cameraPosition;
        float3 rd = -cameraVector;


        float totalDensity = 0;

        float stepDist = 0.01f;
        float3 pos = cameraPosition;

        for (int i = 0; i<steps; i++){

        float d = density * stepDist;

        totalDensity += d;

        pos += rd*stepDist;

        }


        float4 o = 0;
        o.rgb = totalDensity;
        return o;

    }


};
 |
| A constant density trace on all directions isnt very exciting right? : / |
Adding density
Lets spice things up with a variable density. First wee need a density function. There are many ways to do it, in this case we will take advantage of the signed distance field functions (SDFs) since they are cheap and easy to use (another usefull method for complex shapes is to sample a volume texture). If you wonder what SDF functions are, take a look at the first section of the raymarch post.
Lets add a sphere SDF function to get the distance value we will use to calculate the density:
       //SDF

    float SphereSDF(float3 p, float r)
    {
        float h = length(p) - r;
        return h;
    }
 |
| Visual representation of a sphere SDF. Red in, green out. |
To calculate density there is an old bulletproof formula: e^(-distance*density). This formula is the exponential DirectX fog function, wich comes from the Beer-Lambert law. It basically reduces the input value exponentially in a natural way. It's fine in most situations for soft density decay, but dont be afraid to come up with any other if you need more control.
*The formula explain the attenuation of light in a material. We will use it later to calculate how much light gets to a given point. If you want to know more indepth how this function works please take a look at the reference section.
The implementation its quite straightforward:
    float4 VolTrace (){

        float3 ce = 0;
        float3 ro = cameraPosition;
        float3 rd = -cameraVector;


        float totalDensity = 0;

        float stepDist = 0.1f;
        float3 pos = cameraPosition;


        for (int i = 0; i<steps; i++){


        //Density
        float h = Height(pos);
        float d = 1/exp(h * density) * stepDist;

        totalDensity += d;

        pos += rd*stepDist;

        }


        float4 o = 0;
        o.rgb = totalDensity;
        return o;

    }


    float Height (float3 p)
    {
        return SphereSDF(p,radius);

    }
 |
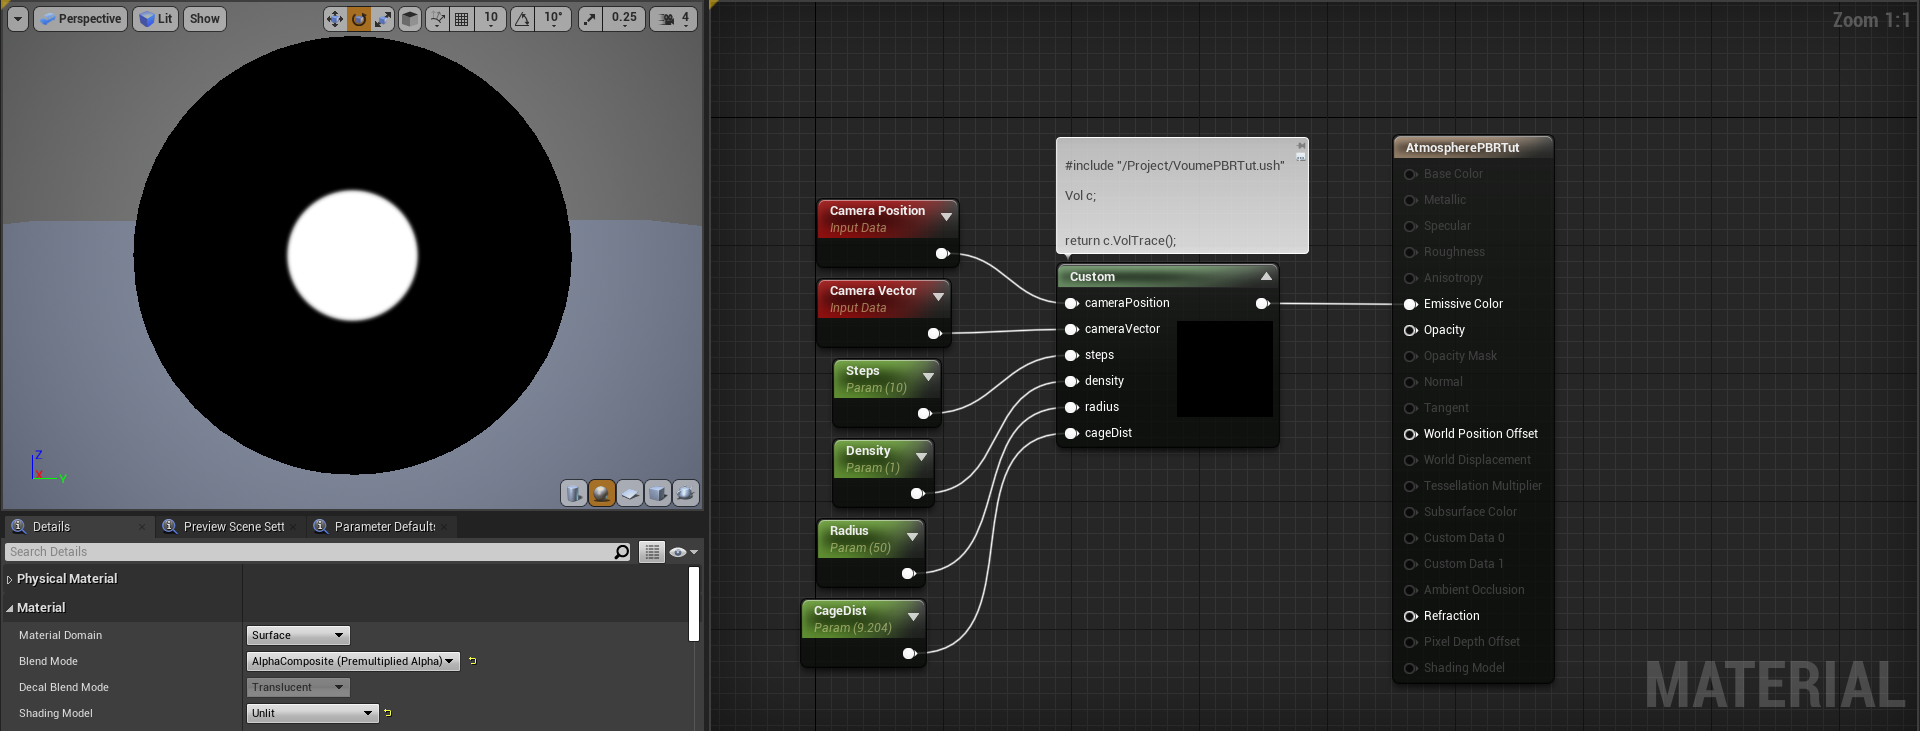
| A blurry dot appear! |
Notice that in order to see something, we need to increase the step size and the step amount. We have a nice density sphere, but the performance is terrible, so lets make our first optimization.
Precision is better than brute force
Now we can create a defined area to make our samples, the closer this area is to the real volume the less samples we waste. So lets create a basic cage, in this case a sphere. This sphere intersection function will return a float2 value, x will be the remaining distance to enter the sphere, y will be the remaining distance to exit. You can check this and other shape intersection formulas in Quillez's website.
Lets add a sphere intersection function like so:
// R: distance to first intersection, G: distance to second intersection
	float2 Intersect( in float3 ro, in float3 rd, in float3 ce, float ra )
	{
		float2 hit;

		hit = SphereIntersection(ro,rd,ce,ra);

		return hit ;
	}
And lets implement it into a basic trace loop:
    float4 VolTrace (){

        float3 ce = 0;
        float3 ro = cameraPosition;
        float3 rd = -cameraVector;


        float totalDensity = 0;

        float2 hit = Intersect(ro, rd, ce,  radius + cageDist );

        if(hit.y < -0.f){return 0;}

        hit = max(hit, 0);
        float stepDist = (hit.y-hit.x)/steps;
        float3 pos = ro + rd * hit.x;


        for (int i = 0; i<steps; i++){


        //Density
        float h = Height(pos);
        float d = 1/exp(h * density) * stepDist;

        totalDensity += d;

        pos += rd*stepDist;

        }


        float4 o = 0;
        o.rgb = totalDensity;
        return o;

    }
 |
| It may look the same as before, but now it performs way better and needs less samples. |
In the intersect function we use radius plus a distance. This distance will be our cage distance, in other words since we trace inside the sphere intersection it has to be bigger than the actual sphere. Feel free to play with distCage value, the smaller the better. If the ray dont intersect the sphere we just return and dont do any samples.
Shading time
Now comes the expensive magic. We will use a directional light, but this should work for any light type with minor tweaks. To start shading wee need two things: first how much light travels from the light to the sample point, and second how much of that light gets to the camera.
The good thing is that we can calculate both with the same formula, the bad is that is expensive so we have to be clever about when to use it.
Lets add the next function to get the overall density a ray has to travel thorugh to get to a point in space. It is basically a short version of the main body of our shader.
With this we can now calculate on the main loop, how much light gets to each sample. Lets apply the Beer-Lambert law ( wich will give us the attenuation of the light at that point) to the final density the light had to travel.float CalculateDensity(float3 po, float3 dir, float3 ce, float s)
{
float outD = 0;
float2 hit = Intersect(po, dir, ce, radius + cageDist);
float rStep = (hit.y-hit.x)/s;
for (int i = 0; i<s; i++){
float h = Height(po);
float d = 1/exp(h * density) * rStep;
outD += d;
po += dir*rStep;
}
return outD;
}
float3 light = 0;
for (int i = 0; i<steps; i++){
//Density
float h = Height(pos);
float d = 1/exp(h * density) * stepDist;
totalDensity += d;
//lighting
float traceDensity = CalculateDensity(pos, lightDir, ce, lightSteps);
float3 att = 1/exp(( (traceDensity + totalDensity) ));
light += d * att;
pos += rd*stepDist;
}
float4 o = 0;
o.rgb = light;
o.a = totalDensity;
return o;
Now we have direct lighting, and if we plug the alpha value into opacity we have a pretty volumetric sphere.

Tecnically, now we have light absortion and homogeneous scattering. What are those complicated things you ask? Without going in too thecnical deep, when a light ray passes trough a volume two things can happen:
Absortion
Scatter
Some photons get scattered by the volume particles, this means that the light changes direction and color/intensity depending on the wavelenth ( now the light get to our eyes with the same intensity no matter the angle we look, so its an homogeneous scatter).Wavelength scatter
Now that we know how much light gets to each point, we can easily calculate the color of that light. If you were curious about light being a float3, this is why. A cheap way to fake this is by multipying a scatter color when calculating the attenuation( so the attenuation ends up being the inverse scatter color ) and multipying the color again when adding the light (so the color creates a gradient to the previous inverted color).
Not the best, but I found it to be the most easy to work with. Ideally the phase functions should account for it.
//lighting
float traceDensity = CalculateDensity(pos, lightDir, ce, lightSteps);
float3 att = 1/exp(( scatterColor * (traceDensity + totalDensity) ));
light += d * att * scatterColor;
 |
| Fake scatter operation |
 |
Phase function
Now its time for the phase function, this is one of the most important things to give a nice look to our volume. Playing with it will allow you to create all kind of volumes, from atmospheres, to clouds or smokes.A phase function defines how the volume scatter the light, in other words, what direction it goes after entering the volume. You can take a more in depth look in the last section here. We are gonna implement the Mie and the Schlick phase functions for this case as we want it to look like a planet atmosphere.
*(The Schlick phase function is meant to replace the more expensive Henyen-Greenstein phase function)
float3 sampleLight = d * att * scatterColor; float mu = dot( rd, lightDir);
//Raylegh phase function
float R = 3.f * (1.f + mu*mu)/(16.f * 3.1416f);
//SchlickPhaseFunction
float k = -0.76;
float S = (1.f - k*k) / (4.f * 3.1416f * (1.f +k*mu) * (1.f + k*mu));
light+= ( sampleLight * HG + sampleLight*R) /2.f ;
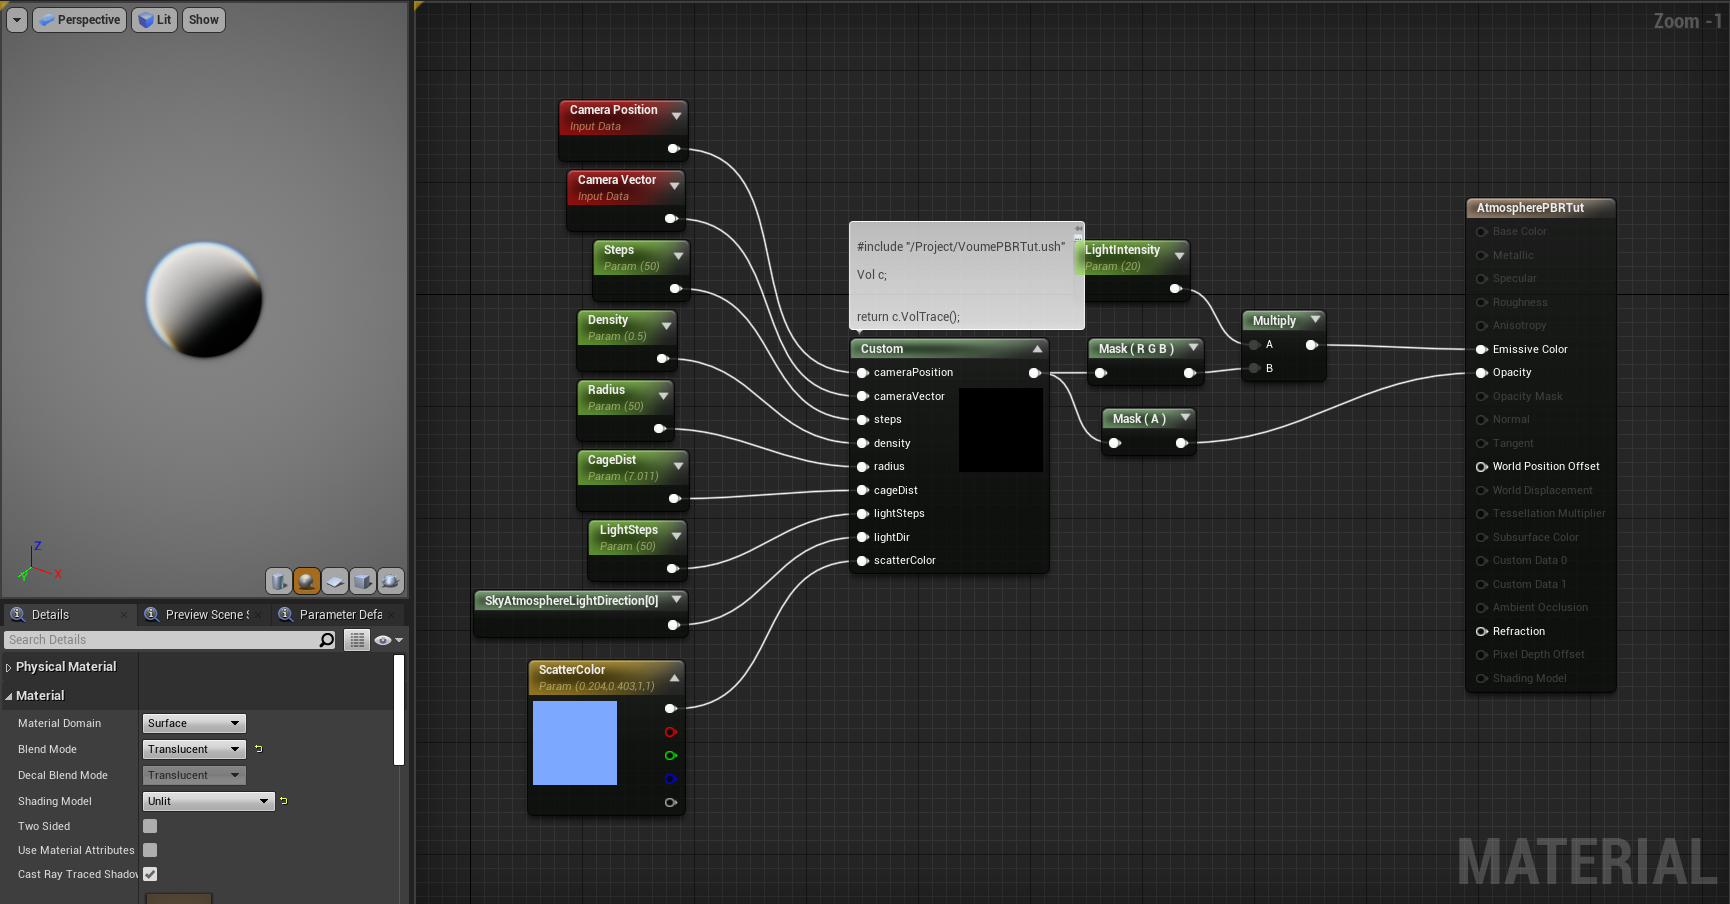
Now we should have something like this, as you can see we get now a different intensity depending on the view angle:


We can easily tweak the cage and distance field to account for different shapes by adding the shape SDF and intersection functions. One of the good things about using SDFs is that we can easily tweak them with any arbitrary deformations like noises, extrusions, rounding,...:
float Height (float3 p) {
float noise = NoiseSDF(p);
return BoxSDF(p,radius) + noise;
//return SphereSDF(p,radius);
}
// R: distance to first intersection, G: distance to second intersection
float2 Intersect( in float3 ro, in float3 rd, in float3 ce, float ra ) {
float2 hit;
hit = BoxIntersection(ro,rd,ra);
//hit = SphereIntersection(ro,rd,ce,ra);
return hit ;
}
//Intersections
float2 SphereIntersection( in float3 ro, in float3 rd, in float3 ce, float ra )
{
float3 oc = ro - ce;
float b = dot( oc, rd );
float c = dot( oc, oc ) - ra*ra;
float h = b*b - c;
if( h < 0.0f ) return float2(-1.f, -1.f); // no intersection
h = sqrt( h );
return float2( -b-h, -b+h );
}
float2 BoxIntersection( in float3 ro, in float3 rd, float3 boxSize)
{
float3 m = 1.0/rd; // can precompute if traversing a set of aligned boxes
float3 n = m*ro; // can precompute if traversing a set of aligned boxes
float3 k = abs(m)*boxSize;
float3 t1 = -n - k;
float3 t2 = -n + k;
float tN = max( max( t1.x, t1.y ), t1.z );
float tF = min( min( t2.x, t2.y ), t2.z );
if( tN>tF || tF<0.0) return float2(-1.f,-1.f); // no intersection
return float2( tN, tF );
}
 |
| A cubic atmosphere! |

There are many ways to optimize it further, from rendering at lower resolutions (ideal for blurred shapes and gradients) to using temporal accumulation, but the post is big enough already. Additionally you can integrate the transform into the shader so the translation/rotation/scale work as expected. The integration is the same as the one we did here ("integrating the actor transform section" at the end). This is the final code and material:
#pragma once
struct Vol
{
float4 VolTrace (){
float3 ce = 0;
float3 ro = cameraPosition;
float3 rd = -cameraVector;
float totalDensity = 0;
float2 hit = Intersect(ro, rd, ce, radius + cageDist );
if(hit.y < 0.f){return 0;}
hit = max(hit, 0);
float stepDist = (hit.y-hit.x)/steps;
float3 pos = ro + rd * hit.x;
float3 light = 0;
for (int i = 0; i<steps; i++){
//Density
float h = Height(pos);
float d = 1/exp(h * density) * stepDist;
totalDensity += d;
//lighting
float traceDensity = CalculateDensity(pos, lightDir, ce, lightSteps);
float3 att = 1/exp(( scatterColor * (traceDensity + totalDensity) ));
float3 sampleLight = d * att * scatterColor;
float mu = dot( rd, lightDir);
//Raylegh phase function
float R = 3.f * (1.f + mu*mu)/(16.f * 3.1416f);
//Henyen-Greenstein phase function
float g = 0.76f;
float HG = (1-g*g)/((4.f * 3.1416f) * pow( 1 + g*g - 2.f*g*mu, 1.5f));
//SchlickPhaseFunction
float k = -0.76;
float S = (1.f - k*k) / (4.f * 3.1416f * (1.f +k*mu) * (1.f + k*mu));
light+= ( sampleLight * HG + sampleLight*R) /2.f ;
pos += rd*stepDist;
}
float4 o = 0;
o.rgb = light;
o.a = totalDensity;
return o;
}
float Height (float3 p)
{
float noise = NoiseSDF(p);
return BoxSDF(p,radius) + noise;
//return SphereSDF(p,radius);
}
// R: distance to first intersection, G: distance to second intersection
float2 Intersect( in float3 ro, in float3 rd, in float3 ce, float ra )
{
float2 hit;
hit = BoxIntersection(ro,rd,ra);
//hit = SphereIntersection(ro,rd,ce,ra);
return hit ;
}
float Phase( float3 lDir, float3 rd)
{
return (dot(lDir,rd));
}
    float CalculateDensity(float3 po, float3 dir, float3 ce, float s)
    {

        float outD = 0;
        float2 hit = Intersect(po, dir, ce,  radius + cageDist);
        float rStep = (hit.y-hit.x)/s;

        for (int i = 0; i<s; i++){

        float h = Height(po);
        float d = 1/exp(h * density) * rStep;

        outD += d;


        po += dir*rStep;

        }

        return outD;

    }
//SDF
float SphereSDF(float3 p, float r)
{
float h = length(p) - r;
return h;
}
float BoxSDF( float3 p, float s)
{
float3 q = abs(p) - s;
return length(max(q,0.0)) + min(max(q.x,max(q.y,q.z)),0.0);
}
float NoiseSDF(float3 p)
{
float size = radius * 0.05f;
return sin(size*p.x)*sin(size*p.y)*sin(size*p.z);
}
//Intersections
float2 SphereIntersection( in float3 ro, in float3 rd, in float3 ce, float ra )
{
float3 oc = ro - ce;
float b = dot( oc, rd );
float c = dot( oc, oc ) - ra*ra;
float h = b*b - c;
if( h < 0.0f ) return float2(-1.f, -1.f); // no intersection
h = sqrt( h );
return float2( -b-h, -b+h );
}
float2 BoxIntersection( in float3 ro, in float3 rd, float3 boxSize)
{
float3 m = 1.0/rd; // can precompute if traversing a set of aligned boxes
float3 n = m*ro; // can precompute if traversing a set of aligned boxes
float3 k = abs(m)*boxSize;
float3 t1 = -n - k;
float3 t2 = -n + k;
float tN = max( max( t1.x, t1.y ), t1.z );
float tF = min( min( t2.x, t2.y ), t2.z );
if( tN>tF || tF<0.0) return float2(-1.f,-1.f); // no intersection
return float2( tN, tF );
}
};
 |
| A nice and soft sky |
Hope you liked the post, got it sitting around for a while. Have fun with shaders and see you in the next one!

References:
https://shaderbits.com/blog/creating-volumetric-ray-marcher
https://www.scratchapixel.com/lessons/3d-basic-rendering/volume-rendering-for-artists
https://www.scratchapixel.com/lessons/procedural-generation-virtual-worlds/simulating-sky/simulating-colors-of-the-sky
Volume rendering with sdfs
https://wallisc.github.io/rendering/2020/05/02/Volumetric-Rendering-Part-1.html
Comments
Post a Comment